If you are trying to figure out how to create a word document form, you probably didn’t get into business to fiddle with table borders.
But if you are currently searching for how to create a word document form, you are likely stuck in formatting purgatory. Whether it is a customer order form, a feedback sheet, or an internal HR request, getting Microsoft Word to behave like a strict data-entry tool is notoriously difficult.
One wrong click, and your carefully aligned text boxes explode onto the next page.
If you need to build one manually, this guide will show you exactly how to do it without losing your mind. But if you are doing this frequently, we will also show you how to stop building them entirely.
The Two Ways to Create a Word Document Form
There are two paths you can take here. One is quick but rigid; the other is flexible but painful.
Path 1: The Close Enough Template
If you aren’t picky about branding, Word has pre-built options.
-
Go to File > New.
-
In the search bar, type “Forms”.
-
Select a template and click Create.
The Downside: You are stuck with their design. As soon as you try to add your logo or move a text box, the formatting often breaks.
Path 2: Create From Scratch
If you need a specific layout, you have to build it from scratch. This gives you control, but it requires diving into the “Developer” settings that Microsoft hides from the average user.
Here is the step-by-step guide to doing it right.
How to Create a Word Document Form from Scratch
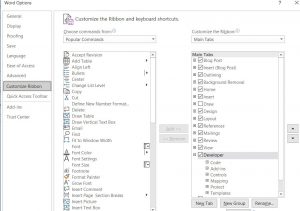
1. Reveal the Developer Tab
Microsoft hides the form-building tools by default. You need to unlock them.
-
The Action: Go to File > Options > Customise Ribbon. On the right-hand list, check the box for Developer and click OK.
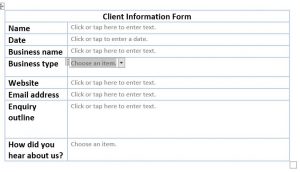
2. Build Your Grid
Never use the spacebar to align text. It will look different on every computer that opens it. The secret to a stable form is a Table.
-
The Action: Go to Insert > Table. Map out a grid that includes cells for your labels (e.g., First Name) and empty cells for the user’s answers.
3. Add Fields to Your Word Document Form
This is where you turn a static document into a functional form. On your new Developer Tab, look for the Controls group.
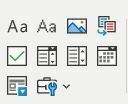
Use these buttons to insert interactive elements into your table cells:
-
Rich Text Control: For names and long answers.
-
Drop-Down List: To force users to pick specific options (Crucial for clean data).
-
Date Picker: To stop people from typing “1st Jan” one time and “01/01” the next.
4. Protect Your Work
If you send this out now, users will accidentally delete your questions or stretch your table. You must lock the document so they can only touch the answer fields.
-
The Action: Click Restrict Editing on the Developer tab.
-
The Setting: Check “Allow only this type of editing” and select Filling in forms from the dropdown. Start enforcement with a password.
The Admin Trap: Why Manual Forms Fail
You have just spent 45 minutes building a single form. But the work isn’t done.
-
The Data Entry Gap: When a client fills out this Word doc and emails it back, someone on your team has to open it and manually type that data into your CRM or database.
-
The Version Chaos: What happens when you need to update a disclaimer? You have to edit the master file and hope your team stops using the old v1 saved on their desktops.
The Better Way to Create a Word Document Form (Use Doc2)
Learning how to create a word document form is a useful skill for one-off tasks, but it is not a scalable business process.
If your team is sending out more than five forms a week, you need a smarter solution.
How Doc2 Eliminates the Form-Building Headache
At Doc2, we replace static Word documents with intelligent, web-based workflows.
-
Separate Data from Design: You simply answer a few questions in a clean web interface, and Doc2 automatically generates the perfect document in the background. You never have to touch a table border again.
-
Eliminate Broken Forms: Word documents look terrible on mobile and often break if a user hits Enter in the wrong place. Doc2 provides a sleek, web-based experience that guides your client through the questions and validates their answers, ensuring you get perfect data back every time.
-
Total Compliance: When you update a template in Doc2 (like changing a legal term), every new document generated uses that update instantly. No more “old versions” floating around on shared drives.
Your time is worth more than fixing broken table borders. Stop wrestling with layout issues and start generating professional, error-free documents in seconds. Get your sanity back, try Doc2 today.

Updated January 2026